 japanese
last update 2011-02-08
What is GpetView?
GpetView - Gtk-base Analyze image viewer
GpetView is light-weight image viewer based on Gtk+ library. The
supported image format is ANALYZE(TM) format (Mayo Foundation ). GpetView can run on
Unix-systems, such as Linux, Solaris, IRIX, Mac OS-X etc. From Version
2.0, GpetView can also run on Win32 system, if you have installed Glib
and Gtk+(2.x). Glib andGtk+ can be found at http://www.gtk.org.
For Windows users, you can find Gtk+ libraries at http://gladewin32.sourceforge.net/modules/news/
GpetView has the following features;
* very light-weight
* view images as transverse, coronal, or sagittal
* change color-map (support Analyze lkup file)
* zoom images
* ROI (Region-Of-Interest) with shapes of circle, ellipse, rectangle,
polygon and automatic edge detection
* Image histogram and profile
License
GpetView is free software; you can redistribute it and/or modify it
under the terms of the GNU General Public License as published by
the Free Software Foundation; either version 2, or (at your option) any
later version.
GpetView is distributed in the hope that it will be useful, but WITHOUT
ANY WARRANTY; without even the implied warranty of
MERCHANT ABILITY or FITNESS FOR A PARTICULAR PURPOSE. See the GNU
General Public License for more details.
Version
Version of GpetView is currently 3.5. From 3.0, GpetView use Gtk2
instead of old Gtk1 library.
Installation
You can download source files of GpetView by clicking here.
This file is tar+gz, so you can extract files by "tar xvzf
gpetview-3.5.tar.gz" or "gzip -c gpetview-3.5.tar.gz | tar xvf -"
Before compiling GpetView, you must install Glib2.x and Gtk2.x. I
also recommend you to install GNU gcc and GNU make to compile GpetView.
Then you can compile and install by
cd gpetview-3.5
./configure
make
make install
Please check configure option, by ./configure --help if you get
error during the compilation. If you fail to compile GpetView, please
let me know.
For Windows user, at first you must install gtk+ runtime library
from http://sourceforge.net/projects/gladewin32/(you
need
only
gtk+-win32-runtime).
And you download zip
file and extract all files into a certain folder.
Usage
Startup
You can start GpetView by typing 'gpetview'. You can also specify image
file as first argument of gpetview as 'gpetview image'.
Alternatively if you put '-p' option, gpetview try to read from
standard input. ' cat image.hdr image.img | gpetview -p'
to
display image.img. '-p' option is useful if you make a filter
program.
For example, I wrote a program 'ecat2ana' which converts from CTI ECAT
image to Analyze image. I can see ecat image 'image.v' in
gpetview by 'ecat2ana
image.v -p| gpetview -p'.
The default window size of gpetview is 750x550 and canvas size is
1000x1000. If you want to change these sizes, you can use option -w and
-c respectively. For example 'gpetview -w 300 300 image', make gpetview
window with 300 pixel by 300 pixel size.
Another options are as follows;
-a: absolute max, min
-b: title
-c: canvas size width=canvasx,height=canvasy
-d: temporary directory for ROI
-e: max for each slice
-h: this message
-g: specify ROI name
-i: 1 for interpolation on
-l: color lookup table 0-rainbow 1-hot 2-gray 3-invgray 4-comb 5-lkup
-n: 1 for numbering on
-o: output stdout
-p: get image from pipe
-q: slice selection
-r: relative max,min
-s: 0-trans 1-coronal 2-sagittal
-t: timestamp
-u: lookup file
-w: window size width=winx,height=winy
-y: 1 for reverse Y on
-z: zoom
If you give -h with gpetview, you will see help of starting options
Default file
GpetView reads the default setting file at start. The file is placed at
your home directory as .gpetviewrc (For Win user, use gpetviewrc
in the
folder as same as gpetview).
The format of the default file is
keyword value
The following keywords are recognized by GpetView
- color - determine the colormap to use for
displaying images.
Recognized values are rainbow, hot, gray andlkup
- number - determine whether
showing image number or not.
Recognized values are on and off
- interpolate - determine
whether use bilinear interpolation
for zooming image or not. Recognized values are on and off
- slice - determine image
slice as transverse, coronal or
sagittal section. Recognized values are trans, coro,and sagi
- zoom - zooming factor.
specify value > 0
- max - determine displayed image max for each
slice or whole
images. Recognized values are each and all.
- revy - reverse Y axis if you give 'on' as value, otherwise give
'off'
- window x y - window size of x width and y height
- canvas x y - canvas size of x width and y height
- pickp - pickup pixel value from beginning of GpetView by giving
'on' as value.
- lwidth - ROI line width
- forec - foreground color (R G B) if you give forec 255 0 0, the
color of ROI and number become red.
- label - 'on' colorbar labelling of maximum pixel value
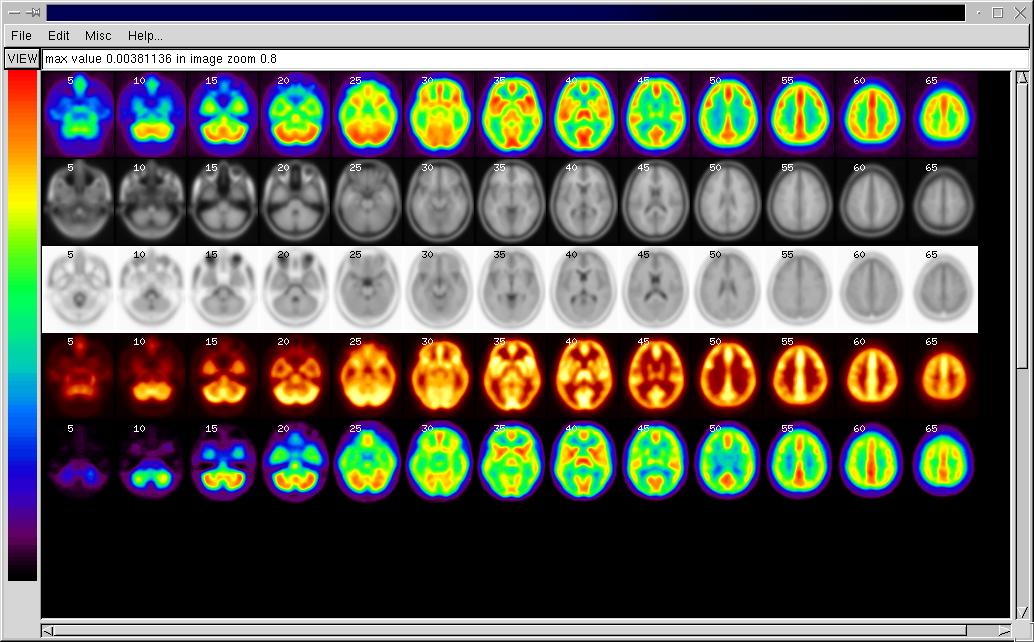
View image
You can select image file from Menu 'File' ->'Image File..' or (just
type control+o), then you type the file name you want to see in the
entry 'File name:'. After selecting the file, push 'Load' button.
Once you load the image file, you can see the image by pushing 'VIEW'
button at the left corner of GpetView.
By typing control + c, you will be asked to clear the screen. You can
load a new image file.
By typing control+v, GpetView clears screen and display images
Setting
Setting panel can be found under menu, 'Edit'. Or just type
's' on
the canvas of GpetVIew.
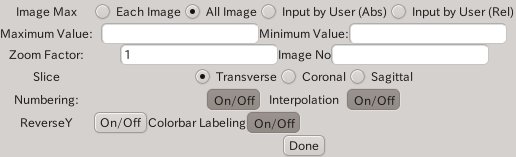
- Image Max - Set maximum for each slice, or set maximum for all
slices (default), or you can put your setting of maximum and minimum
values either in absolute or relative (%) sense.
- Zoom Factor: - You can specify float value (>0) for
zooming factor.
- Image No - Specify which images you want to see. For
example, if you want to see slices of 1 and 10. enter 1,10 in
the
Image
No
entry. If you want to see images from slice 1 to 10, enter 1:10
in the Image No entry.
- Numbering On/Off - If you don't like to show the plane
number, please use this button.
- Interpolation On/Off - When you zoom image, it effects
the
appearance of the image.
- ReverseY On/Off - Reverse Y axis, Usually it is
on for
Analyze format image
- Colorbar Labelling On/Off
- Show maximum pixel value in colorbar
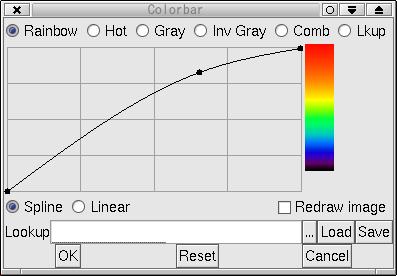
Adjust colorbar
If you click a left button of mouse on colorbar (left side of
gpetview
window), you will see colorbar window.
You can choose color model either rainbow (default), hot metal,
grayscale, inverse grayscale, combination (between rainbow and
grayscale, this color model is useful to display PET-MRI coregistration
image), lookup (user defined lookup color model)
You are also able to adjust color scale using this colorbar
window.
If you toggle 'Redraw image' on, colormap of your current image will be
updated when you click 'OK' button. 'Reset' button makes color scale as
a straight line.
You can save your defined color lookup table by clicking Save button or
you can load previously defined lookup table file by Load button.
Lookup table file has '.lkup' extension.
Analyze Images with ROI (Region-Of-Interest) etc.
ROI panel can be found under menu, 'Edit'
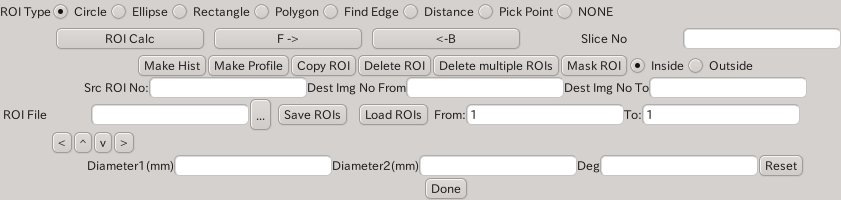
Once you select ROI type, you see the ROI on one image.
You can manipulate ROI by mouse
Left-button - move ROI
middle-button - change size of ROI
right button - rotate ROI
When you select ROI type 'Circle', 'Ellipse', or 'Rectangle', Entries
Diameter1 (diameter of circle), Diameter2 (diameter of ellipse) and Deg
(degree) are
effective.
Push Button 'ROI Calc' when you set ROI (alt + R can do this).
If you want to change the image which you want to make ROI, push
button'F ->' (Forward) or '<-B' (Backward).
Alternatively you can specify the plane number in the box under
the
buttons F-> and <-B.
You can see results of ROI by Menu 'MISC' -> 'ROI Info...'
Another buttons are
- Make Hist - Make histogram inside ROI. It shows
Histogram Plot. You will move your mouse on the histogram and gpetview
let you know the location of mouse pointer. You can save the
histogram
data as text file by pushing Save button.
- Make Profile - Calculate Line profile of a image. You
must
select Rectangle ROI. Profile window has two plots of X and Y
directions. By moving mouse, you will see the height of the profile.
You
can save the profile data as text file by pushing Save button.
- Copy ROI - Copy a ROI (specified by Src ROI No:)
to the destination images (specified by Dest Img No From, Dest Img
No To: )
- Mask ROI - Generate image masked by ROI (toggled
whether
Inside or Outside of ROI)
- Delete ROI - delete current ROI
- Delete multiple ROIs - delete multiple ROIs specified in Dest No
From and To
- Save ROIs - save ROI data. Put file name in ROI File
entry.
No extension in File name. ROI data are saved as FILE.1,...
FILE.n,where FILE is the name you enter and n is
total ROI number. So n ROI files are created.
- Load ROIs - load ROI data. Specify from and to ROI No.
- <^v> - move current ROI in one pixel for four directions.
- Reset - Reset ROI figure as default
- Done - close ROI panel
ChangeLogs
2011-02-08 Version 3.5 Use Pango
for displaying numbers
2011-01-07 Version 3.4 ROI
move in four directions. Delete multiple ROIs. Label colorbar. show ROI
area in mm2. Some bugs are fixed
2010-08-28 Version 3.3 Bug fix for mask ROI. -d
option to specify directory for temporary ROI
2010-07-02 Version 3.2 circular and
rectangular ROI with mm size. -g option for ROI name
2008-06-27 Version 3.1 Bug fix for find
edge. forec for foreground color.
2007-01-05 Version 3.0 GpetView for
Gtk2
2006-08-14 Version 2.9 enable to
display 8bit image which maximum value is less than 255. line width for
ROI primitives by lwidth in .gpetviewrc
2005-07-14 Version 2.8 mark ':' is
used instead of ';' to make sequential numbers in slice selection.
Maximum sequence number is now 50000 to read big images. gpetview can
now handle negative absolute value properly.
2005-01-20 Version 2.7 bug fix for
color lookup table. Add roi_calc menu (shortcut alt+R) to do ROI
calculation
2004-03-05 Version 2.6 color lookup
table can be saved and
loaded. -u option. bug fix
2003-06-28 Version 2.5 add -e -b
options. several bug fix
2003-05-20 Version 2.4 internally
use 256 colors. File browser
for all places.
2003-04-10 Version 2.3 Histogram
Window and Profile Window are
improved. Setting Window is now not modal.
2003-03-31 Version 2.2 minor bug
fix. temp file for win32. file
open bug for win32.
2002-10-24 Version 2.1 minor bug
fix. change Colormap of rainbow.
gpetviewrc for Win32. Change numbering ROI file for saving
2002-08-28 Version 2.0 Porting to
Win32
2002-08-22 Version 1.14beta color
setting in colorbar_window.
introduce "redraw image" to update colormap of current image. bug fix
for pipe arguments. bug fix for inv gray color.
2002-08-19 Version 1.13beta
colorbar window for adjusting
colorbar.add new starting options. thresholding if you start gpetview
with -a. bug fix for header edit.
2002-05-09 Version 1.12beta change
layout of ROI panel. show
header name in header info. change default colormap
2002-01-28 Version 1.11beta take
account of time information.
deal with ROI with different zooming.
2001-11-14 Version 1.10beta modify
header info. add inverse gray
color scale. swap toggle for header save. add clear&view to make
shortcut
2001-09-17 Version 1.09beta Add
zooming option, absolute and
relative maximum values option. Selected image for ROI is determined by
mouse. window title reflects image name.
2001-09-04 Version 1.08beta clean
up ROI file routine, bug fix
for image numbering, rearrange header info and save routine, add window
size setting
2001-05-21 Version 1.07beta Add ROI
number entry box. Bug fix in
ROI calculation
2001-05-08 Version 1.06beta
Cleanup ROI routines. Add overwrite
confirmation and bug fix in save_hdr, save roi_info
2001-04-09 Version 1.05beta fix bug
in img_lib.c. Add reverse
Yaxis. Fix bug for find_edge and roi_calc and pick_p if you use
zooming.
2001-01-22 Version 1.04beta Version
control by CVS
2000-12-17 Version 1.03beta
2000-12-12 Version 1.02beta
2000-11-24 Version 1.01beta
Acknowledgments
- "dbh.h", Analyze Format description file provided courtesy of
Biomedical Imaging Resource, Mayo Foundation, Rochester, MN
- GpetView uses several image library codes written by John
Ashburner(Wellcome Department of Cognitive Neurology, London, UK).
- I use Glade to develop user
interface.
Links
- For the person who wants to do image manipulation, try PyBLD. Using both PyBLD and gpetview is
the best combination.
Mail comments and bug reports to
watabe at
cyric.tohoku.ac.jp
Enjoy
Hiroshi Watabe